
In part 1, you have learned about the different types of tests that are available for Android. As a quick refresher, there are two types of test. One is pure java test, which only requires the Java Virtual Machine (JVM) to run and doesn’t require any dependency on the Android SDK. The other is an android test, which does require the usage of Android specifics.
I believe strongly in learning with examples (learn by doing), so, for this post, we’ll be creating a simple app using the Model View Controller (MVC) architecture. Along the way, you will learn how to write unit tests and UI tests. For this post, I am assuming you already have a foundation for Android development. You can already develop Android apps but want to learn about testing.
The Simple App
The app that we’ll be building is quite simple. It shows information about one place, for this example it is Disneyland. When the user presses the button, it shows the information about Disneyland and that is it.

Before you go off recreating this app, stop. The purpose of this app is to exercise testing while developing the app. The code for this sample app is available on GitHub if you want to use it as a reference.
Setting up the Testing Environment
I would recommend you use Android Studio version 3.x since it does automatically set up most of what you need for testing. Using Android Studio version 3.1.2, I only need to add into the gradle file the following line for dependencies:
androidTestImplementation 'com.android.support.test:rules:1.0.2'
For this example, start with an Empty Activity project from Android Studio.
Place Class
Before we can write any unit tests, we need to create a pure Java object first. To do this, create a new Java class and call it “Place”. As for the package name append “.data.model” to the default package name. You don’t need to do this, but it will make things clearer and organized.
The Place class will read data from an input stream to initialize itself. For this example, the input stream will be coming from a text file that holds the information about Disneyland. Here is the content of the text file:
id=disneyland
name=Disneyland

1313 Disneyland Dr
Anaheim, CA 92802

Disneyland Park, originally Disneyland, is the first of two theme parks built at the Disneyland Resort in Anaheim, California, opened on July 17, 1955. It is the only theme park designed and built under the direct supervision of Walt Disney
Place this file in a directory name “raw” under “res”. Create the raw directory if it is not there. Also, make a copy and put it in the “test” directory under the “resources” directory. Again, create any directories that are not there. Once you’re done, you should have a structure similar to the following:

Place Class Code
public class Place {
    public static final String ID_PREFIX = "id=";
    public static final String NAME_PREFIX = "name=";
    public final String id;
    public final String name;
    public final String description;


    private Place(String id, String name, String description) {
        this.id = id;
        this.name = name;
        this.description = description;
    }

    public static Place readFromStream(InputStream stream) {
        if (stream == null) return null;

        String id = null;
        String name = null;
        StringBuilder descriptionBuilder = new StringBuilder();

        BufferedReader reader = new BufferedReader(new InputStreamReader(stream));

        try {
            String line = reader.readLine();
            while (line != null) {
                if (line.startsWith(ID_PREFIX)) {
                    id = line.substring(ID_PREFIX.length());
                } else if (line.startsWith(NAME_PREFIX)) {
                    name = line.substring(NAME_PREFIX.length());
                } else {
                    if (descriptionBuilder.length() > 0) {
                        descriptionBuilder.append("\n");
                    }
                    descriptionBuilder.append(line);
                }

                line = reader.readLine();
            }

        } catch  (Exception e) {
            e.printStackTrace();
            return null;
        }

        return new Place(id, name, descriptionBuilder.toString());
    }
}
The Place class reads from the input stream and parses the information. Once the parsing is complete, it initializes with the parsed information.
Writing Unit Tests
Now it’s time to write tests for the Place class. To create a test class for Place, click on the class name in the class declaration and press CTRL + SHIFT + T (for Windows) to bring up the Android Studio interface to create a test class.

Choose to create a new test and press OK to proceed.

For the destination, choose the one that says “test” because there are no Android specific components involved.

Afterward, Android Studio will generate the PlaceTest class for you to write your tests. We’ll be writing two tests, one is to test for no input stream and another is for correct information about Disneyland. Here are the test cases:
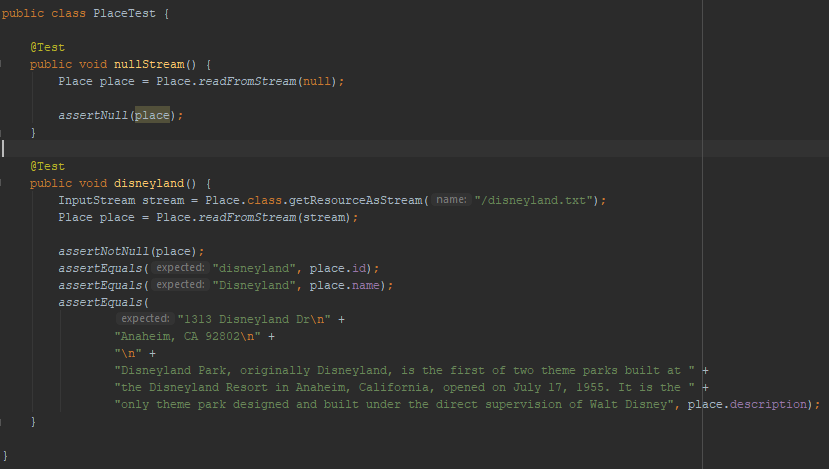
In case if you’re wondering why I am using a screenshot instead of text, it is because I believe you’ll learn more if you type the tests.
To run all the tests, click on the green arrow next to the class declaration.
![]()
Both tests should pass. As a note, clicking the green arrow next to a test will only run that specific test. After the tests run, you will see the result in Android Studio.

Creating the User Interface
Before testing the user interface (UI), we need to create it first. Since this is not the focus of the post, you can create it yourself or use what I have:
<android.support.constraint.ConstraintLayout xmlns:android="http://schemas.android.com/apk/res/android"
    xmlns:app="http://schemas.android.com/apk/res-auto"
    xmlns:tools="http://schemas.android.com/tools"
    android:layout_width="match_parent"
    android:layout_height="match_parent"
    tools:context=".ui.MainActivity">

    <TextView
        android:id="@+id/placeInfoTextView"
        android:layout_width="0dp"
        android:layout_height="0dp"
        android:layout_marginEnd="8dp"
        android:layout_marginStart="8dp"
        android:layout_marginTop="14dp"
        android:text="@string/default_message"
        android:textSize="24sp"
        app:layout_constraintBottom_toBottomOf="parent"
        app:layout_constraintEnd_toEndOf="parent"
        app:layout_constraintStart_toStartOf="parent"
        app:layout_constraintTop_toBottomOf="@+id/showDisneylandInfoButton" />

    <Button
        android:id="@+id/showDisneylandInfoButton"
        android:layout_width="0dp"
        android:layout_height="wrap_content"
        android:layout_marginEnd="8dp"
        android:layout_marginStart="8dp"
        android:onClick="showDisneylandInfo"
        android:text="@string/show_disneyland_info"
        app:layout_constraintEnd_toEndOf="parent"
        app:layout_constraintStart_toStartOf="parent"
        app:layout_constraintTop_toTopOf="parent" />

</android.support.constraint.ConstraintLayout>
For the MainActivity class, you will need to add the logic to display the information from the Place object. Again, you can write it yourself or use what I have:
public class MainActivity extends AppCompatActivity {
    public void showDisneylandInfo(View view) {
        InputStream inputStream = getApplication().getResources().openRawResource(R.raw.disneyland);
        Place disneyland = Place.readFromStream(inputStream);

        updateTextViewWithPlaceInfo(disneyland);
    }

    @Override
    protected void onCreate(Bundle savedInstanceState) {
        super.onCreate(savedInstanceState);
        setContentView(R.layout.activity_main);

        setTitle("Place Info");
    }

    private void updateTextViewWithPlaceInfo(Place place) {
        if (place == null) return;
        TextView placeInfoTextView = findViewById(R.id.placeInfoTextView);
        String placeInfo = place.name + "\n" + place.description;

        placeInfoTextView.setText(placeInfo);
    }
}
Writing UI Tests
With the UI and its logic done, it is time to create some UI tests. Click on the MainActivity class declaration and press CTRL + SHIFT + T and create a new test class. This time choose the destination to be “androidTest” because the tests will require some Android specific components.
You will also need to add the dependency for test rules in your gradle file. You can add the dependency with the following line:
androidTestImplementation 'com.android.support.test:rules:1.0.2'
As a reference here is how the dependencies of your gradle file should be like once you’re done.

For UI testing, we’ll have two tests. One to check if the information showing is correct on a fresh start. The other is if the information about Disneyland is correct after simulating a click of the button.

Once you’re done, run all the tests. This time, you do need to have an Android emulator or a physical device. After the tests run, you will see the result in Android Studio.
![]()
That is it, you have written some unit tests and UI tests for Android under the MVC architecture. Although, this was a simple example I hope you can see how writing tests can help you develop more robust code.
If you found this post helpful, share it with others so they can benefit too.
What are your experiences with writing tests for Android? Do you find them to be helpful?
To get in touch, you can follow me on Twitter, leave a comment, or send me an email at steven@brightdevelopers.com.