
At this point you have a modified kernel and a working boot image, but you may notice you have to manually setup each time on boot. For example you added NTFS support and every time on boot you need to manually create a mounting point and then mount the NTFS storage. Every time when your Shield TV boots up, all the setup you have done is missing including changes to preexisting files. In order to keep your changes persistent, you must modify the boot image directly. Before making changes to the boot image it would be useful to know a bit about the boot image structure.
Note: Keep back up of your boot image as it is very easy to break the boot image depending on the changes you want to make.
Boot Image Structure
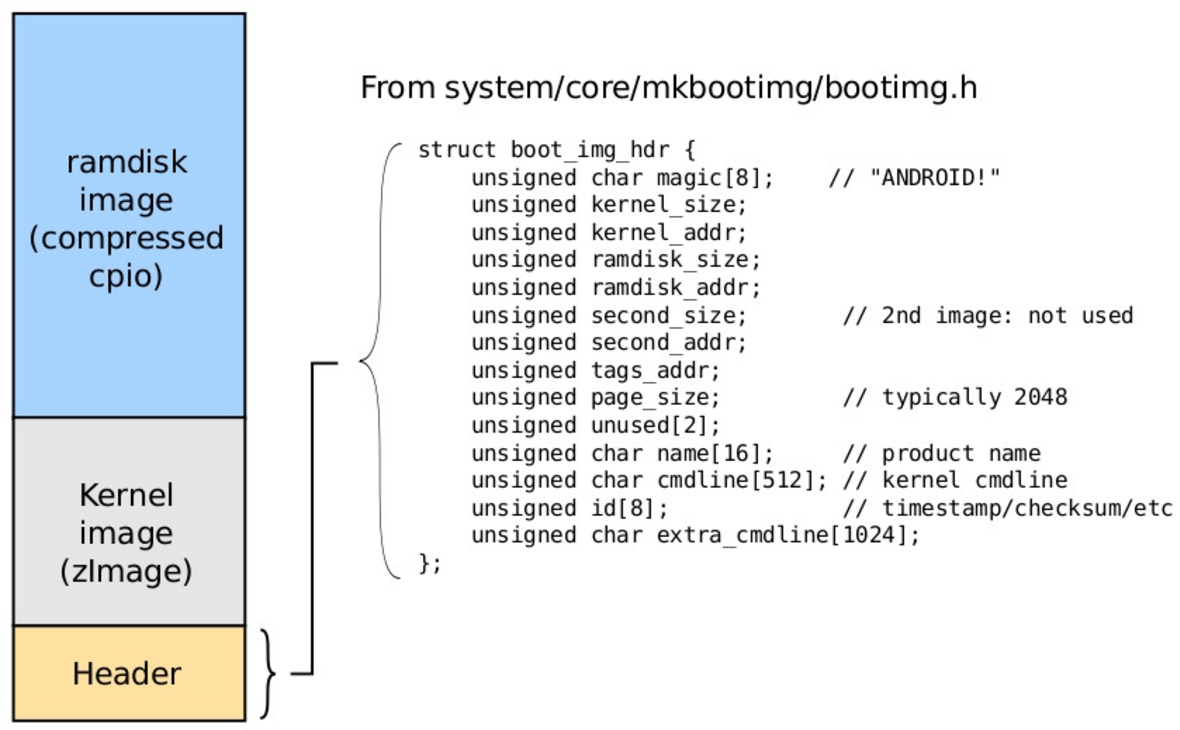
The boot image is comprised of 3 parts:
- header: stores information about the boot image such as product name, kernel size and address, ram disk size and address, page size, etc
- kernel: central part of the android system that manages tasks and the hardware
- ramdisk: holds the read-only system files that gets loaded every time on boot
The files and directories in ramdisk gets loaded every time on boot, which is why some of the changes made prior to these files does not persist. Directories that are not part of the ramdisk also gets remove on boot too.
Modify Boot Image
The modification process is carry out on Ubuntu 16.04 LTS using the scripts found at xda-developers.
For convenience here is a list of the function of each script:
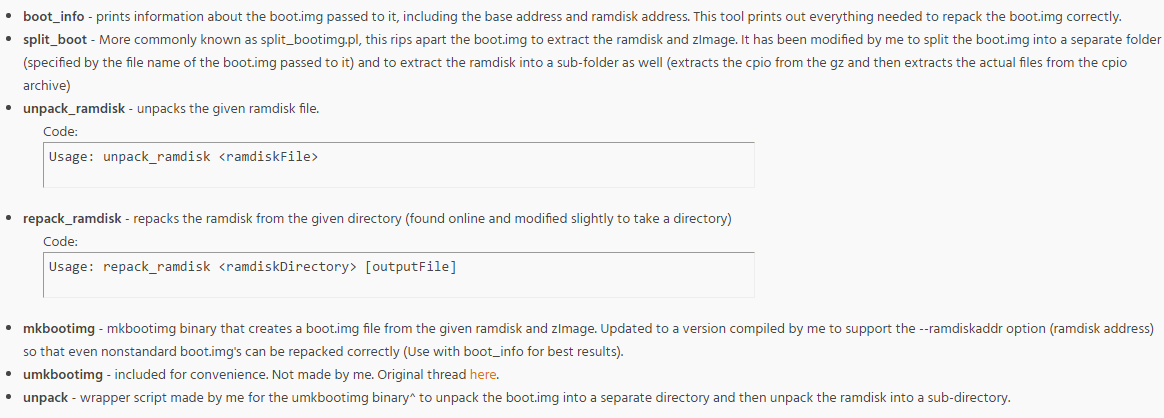
Setup Scripts
# download the scripts
cd ~/Downloads
unzip ./bootimg_tools.zip
# set each script to be executable
sudo chmod +x ./boot_info
sudo chmod +x ./split_boot
sudo chmod +x ./unpack_ramdisk
sudo chmod +x ./repack_ramdisk
sudo chmod +x ./mkbootimg

# update your path to include scripts
PATH=$PATH:~/Downloads
Unpack Boot Image
mkdir ~/boot_image_mod
# copy boot image into boot_image_mod directory
cd ~/boot_image_mod
split_boot ./boot.img
cd ./boot
cd ./ramdisk
# modify files you need (e.g. fstab.<system>, init.<system>.rc, ueventd.<system>.rc, etc)
Repackage Boot Image
# repackage ramdisk
cd ..
repack_ramdisk ./ramdisk/ boot.img-ramdisk-new.cpio.gz

# repack boot image
mkbootimg --kernel ./boot.img-kernel --ramdisk ./boot.img-ramdisk-new.cpio.gz --output boot-new.img
The file “boot-new.img” is the modified boot image that you can flash into the Shield TV. If there was no issue with the modification process, the Shield TV will boot into Android TV with the changes you have made applied on boot.
Alternative Way to Modify the Boot Image
If the above method does not repackage a working boot image here is another way without any scripts. This method will overwrite the boot.img file, so I strongly recommend making a backup of the boot image.
# create backup
cd ~/boot_image_mod
cp ./boot.img ~/boot-backup.img

# extract boot image
sudo apt install abootimg
abootimg -x boot.img

# extract ramdisk
mkdir ramdisk
cd ramdisk
gzip -dc ../initrd.img | cpio -i

# make modifications to files

# repackage ramdisk
cd ..
~/shield-open-source/out/host/linux-x86/bin/mkbootfs ./ramdisk | gzip > ramdisk-new.gz

# repackage boot image
abootimg -u boot.img -f bootimg.cfg -k zImage -r ramdisk-new.gz
Note: mkbootfs gets created during the compile of the kernel and boot image from shield-open-source
I hope this post help some of you out there. Remember by making any changes to the boot image you risk unexpected behaviors. Make your changes slowly and carefully to reduce possible issues as much as possible. Good luck and have fun hacking/coding!
Until next post, take care.