
Motion controllers are essential to virtual reality (VR). They allow you to communicate to the VR world in a simple and natural way. This easy form of communication enhances the VR experience such as making you feel more immersed.
My goal in this post is to go over some tips for using the motion controllers in Unreal Engine 4 (UE4) for VR development.
Set Up Motion Controllers
There are two ways to set up your motion controllers. You can do the set up through Blueprint (BP) or code (C++).
Blueprint Set Up
The UE4 documentation about setting up the motion controllers is very detailed. It also does a wonderful job in laying out each step. I would recommend you check it out to start using the motion controller in BP.
C++ Set Up
If you prefer code instead, you can set up the motion controller in C++. The following code snippet shows how you can set up the motion controllers in an empty character class.
...
UCLASS()
class VRFIRSTPERSON_API AVRCharacter : public ACharacter
{
        GENERATED_BODY()
private:
        UPROPERTY(VisibleAnywhere, Category = "Components")
	UCameraComponent* CameraComp;

	/* Component to specify origin for the HMD */
	UPROPERTY(VisibleAnywhere, Category = "Components")
	USceneComponent* VROriginComp;

	UPROPERTY(EditDefaultsOnly, Category = "VR")
	bool bPositionalHeadTracking;

	/* Motion Controllers */
	UPROPERTY(EditDefaultsOnly, Category = "Components")
	class UMotionControllerComponent* LeftHandComponent;

	UPROPERTY(EditDefaultsOnly, Category = "Components")
	class UMotionControllerComponent* RightHandComponent;
};
/* VR Includes */
#include "HeadMountedDisplay.h"
#include "MotionControllerComponent.h"

#include "VRCharacter.h"

AVRCharacter::AVRCharacter()
{
        // Set this character to call Tick() every frame.  You can turn this off to improve performance if you don't need it.
	PrimaryActorTick.bCanEverTick = true;

	VROriginComp = CreateDefaultSubobject<USceneComponent>(TEXT("VRCameraOrigin"));
	VROriginComp->AttachTo(RootComponent);

	CameraComp = CreateDefaultSubobject<UCameraComponent>(TEXT("CameraComponent"));
	CameraComp->AttachTo(VROriginComp);

	LeftHandComponent = CreateDefaultSubobject<UMotionControllerComponent>(TEXT("LeftHand"));
	LeftHandComponent->Hand = EControllerHand::Left;
	LeftHandComponent->AttachTo(VROriginComp);

	RightHandComponent = CreateDefaultSubobject<UMotionControllerComponent>(TEXT("RightHand"));
	RightHandComponent->Hand = EControllerHand::Right;
	RightHandComponent->AttachTo(VROriginComp);
}
Adding Mesh
When adding a mesh to represent the motion controller, you might run into a case where the mesh does not move or show. To prevent this problem, make sure the mesh is a child of the controller component. When the mesh is a child of the motion component, all of the movements and rotations of the motion controller is applied to its children.
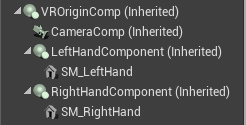
Mesh attached as a child of motion controller component in the UE4 editor
If the mesh is not showing up, make sure the mesh is not set to be hidden in the game. This would make the mesh visible in the editor, but invisible in the actual game.

Mesh rendering setting to be visible in both the editor and the game
Increase Immersion
You can make the motion controllers add more to the immersion factor by not having a floating mesh. For example, add arms and hands to visually represent to the user they are holding the controllers. If you are using a static mesh for the motion controller, swap that out for a dynamic mesh. The dynamic mesh can play different animations in response to different controller inputs.
Add Laser Sight to Motion Controllers
Adding a laser from your VR controller might be helpful for certain occasions. Maybe you need to use the motion controllers to select something in a menu or your VR experience requires aiming. UE4 has a built-in feature to fulfill this purpose known as raycast (tracing).
Raycast Example
In this example, I will show you how to create a laser to point forward relative to your motion controller.
For this example, I will be working with a BP Character set up for VR. Specifically, the character has a camera component for the head-mounted display (HMD) and two motion controller components.
Draw Laser for Left Motion Controller

BP to draw forward laser for left controller
This set of BP draws a forward laser from the left motion controller. The Foward Distance variable defines how far the laser goes. The “LineTraceForObjects” is the raycast (laser for this example) and requires the draw debug type parameter to be set to “For One Frame.” When the laser overlaps with an object, the return value is true and you can extract out the information of the object it overlapped with via the “Out Hit” variable. In addition, you can specify what actors to be ignored and what type of objects would trigger a response from the laser.
To define what type of objects, you can do something along the line of this BP:

Create an array of object types. In this case, static and dynamic objects.
To get the location and rotation of the motion controller in real time, you can do something similar to this BP:

Get location and rotation of the left motion controller.
Draw Laser for Right Motion Controller
The BP and structure are almost identical to drawing the laser for the left controller. The only difference is that all the left motion controller components are replaced with the right motion controller component.
Draw Laser for Both Motion Controllers
Now that you can draw a laser for each motion controller, you can combine the BPs into a convenient function.

Draw laser for the left and right motion controller.
Now you can call this BP function from the “Event Tick” BP node to draw the laser every tick for the motion controllers. If you want to control when to show the lasers, you can easily do that by using a boolean flag and modifying that flag throughout your project.
Debug Laser
You might want to test if your laser is working properly. For example, is it ignoring the correct objects and actors? Here is a BP that you can add to your draw laser function to help you test:

BP to extract the name of the objects the laser overlaps with.
Handle Motion Controller Inputs
UE4 makes handling motion controller inputs simple. There is a single BP event that handles the input from the Vive Wands and Oculus Touch controllers. In the event graph, right-click in an empty spot and search for “motioncontroller” to get an exhaustive list of which button inputs are supported.

List of supported motion controller inputs.
Vive Wands Mapping

Vive wand controller input mapping for UE4
Oculus Touch Mapping

Oculus Touch input mapping in UE4
The touch controllers also are touch capacitive. So it is possible for you to find out if the player is resting their thumb or have it lifted or is gripping the controller or not. To access touch capacitive API, right-click on an empty space in Event Graph and search “captouch.”

List of touch capacitive events. Note: this is only for the Oculus touch controller
Interaction with Motion Controllers and VR Environments
I have some posts that talk about interactions in VR. Therefore, instead of going over them here, you can check out my posts dedicated to the following topics:
Bonus: Vive Tracker as a Motion Controller
If you have a Vive tracker, right now you may not find much use for it besides tracking an object and doing mixed reality videos. There are not many accessories coming out for the Vive tracker either. In addition, game engines like UE4 and Unity are working on getting support for the Vive tracker at the moment.
Good news is that you can change the Vive tracker to be recognized as a Vive wand controller. The button inputs can be by either pogo pins, USB, or a combination of both. The pogo pins are simple to use but do not work for all inputs. USB mode does offer support for all inputs, but it requires a microcontroller that is compatible with the USB stack.
In the developer documentations, you can find information about how the USB data packets need to be formatted for the Vive tracker to recognize them in USB mode. The documentation also includes the layout of what each pogo pin do.
I hope you found this post helpful. If you found this post helpful, share it with others so they can benefit too.
Was there anything else that you think I should add? Do you have any experiences with working with the motion controllers that you want to share? If so, feel free to leave a comment, send me a tweet, or send me an email at steven@brightdevelopers.com.
To stay in touch, you can follow me on Twitter.